Conditional Tags
The backend fully supports conditional tag logic — conditional tags imported from Docusign templates are stored and evaluated correctly during signing. UI-based authoring of conditional tags directly in the Propper Sign editor is not yet available.
Conditional tags let your agreement adapt to each recipient. Instead of showing every field to everyone, certain tags appear or disappear based on what the recipient selects. This keeps agreements shorter and clearer, recipients only see what's relevant to their situation.
Screenshot: conditional-tag-appearing, a tag appearing on the document after a recipient selects an option from a dropdown
How It Works
You designate one tag as the trigger (for example, a dropdown with options "Full-Time Employee" and "Contractor") and other tags as conditional (the fields that appear or hide based on what's selected).
When a recipient makes a selection during signing, the conditional tags respond instantly, appearing or disappearing in real time.
Example, Employment Type:
| What the recipient selects | What happens |
|---|---|
| "Contractor" | "Contract End Date" and "Hourly Rate" tags appear |
| "Full-Time Employee" | Those tags stay hidden |
The recipient only fills in what applies to them.
Common Uses
- Employment forms, Show visa-related fields only if the recipient selects "Non-citizen authorized to work"
- Sales contracts, Show financing terms only if the recipient chooses "Financing" as the payment method
- Insurance agreements, Show pre-existing condition fields only if the recipient answers "Yes" to a medical history question
- Multi-department agreements, Reveal department-specific sections based on a role selection
Setting Up Conditional Tags
- Open your template in the editor.
- Add the trigger tag, the dropdown, radio button, or checkbox that will control other tags.
- Add the conditional tags, the fields that should show or hide.
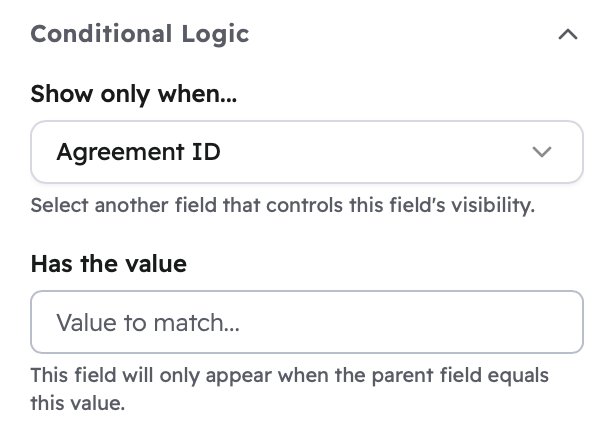
- Select a conditional tag and click Add Condition in the properties panel.
- Choose the trigger tag and the specific value that should trigger this tag to appear.
- Choose the action: Show or Hide.
- Repeat for each conditional tag.
- Save the template.
Tips for Reliable Conditional Logic
- Test every path, Use Preview in the template editor to confirm tags appear and hide correctly for each possible selection. Then send a test agreement to yourself and go through it multiple times, choosing different options each time.
- Place signature tags last, Put signature and initial tags after all conditional sections. This ensures signers see all required tags before reaching the signature, regardless of what conditions were triggered.
- Keep it simple, Conditional logic is most reliable at 1–2 levels of nesting. Avoid building long chains where one conditional tag triggers another, which triggers another.
- Write clear labels, The trigger tag's options should be unambiguous. Recipients must select exactly the right value to trigger a condition correctly.
What Can and Can't Be Conditional
Tags that can trigger conditions: Dropdown, Radio, Checkbox, Text
Tags that can be conditional (shown/hidden): Text, Number, Date, Checkbox, Radio, Dropdown, Attachment
Tags that cannot be conditional: Signature and Initial tags are always visible, they can't be hidden based on a condition.
Related Articles
- Tag Types: which tag types support conditional logic
- Tag Properties: configure labels and other tag settings
- Creating Templates: build templates that use conditional tags